

At the end of the last Knitwear Design 101 post I stated that all patterns have a geometric foundation or plan. The specific word for this plan is a tessellation. This is a mathematical term, but tessellation is known by a number of names depending on your background. Most people understand this as a repeated pattern, and there are many different ways of repeating a pattern.
Tessellations always begin with one motif
The first thing to note is that pattern always begins with a single unit or motif. The tessellation, or repeat, specifies exactly how that unit or motif is multiplied throughout a larger area. Mathematically, this is described in terms of axes or lines of symmetry, but books on surface textiles don’t take this approach!
Today I’ll talk about one type of tessellation symmetry, one that I know will be most accessible and familiar to knitters and crocheters. but I hope it’s also accessible to anyone else interested in surface pattern design.
Types of tessellation | Block repeats and drop repeats
The drop repeat is the most widely used method of tessellation symmetry in knitting and crochet. It can occur along a vertical axis – when most textile books will refer to it as a ‘drop’ repeat – or a horizontal axis, when it can also be referred to as a brick repeat. Mathematicians call the same thing a ‘slide’ or translation. The earliest examples of tessellation involve beautiful artefacts such as Islamic rugs and mosaic tiling, and my personal mnemonic is:
translate > trans slate > move tile.
Whichever terminology you use – translation or drop – both systems indicate that the original slate, tile or motif has moved out of the original alignment. To continue with textile terms, the presence of a drop denotes movement by a fraction of a step, NOT a whole step. Moving the motif by a whole step creates a block repeat, which resembles a simple grid and takes on a square formation.
Examples of block repeats in knit and crochet design
Featured in this gallery is the Unite sweater, which has a block repeat of cable twists and squares bordered with garter stitch.


On the other hand, drop repeats take on a diagonal formation. Below are some examples of half drop repeats: a crochet one along the horizontal axis, and three knitted ones along the vertical axis.
Examples of half drop repeats in knitting
This gallery features the Assembly scarf, which has a half-drop repeat of cables and garter stitch squares. Note how the garter stitch squares form a diagonal path. Each motif, or repeated element, starts exactly halfway down the length of its neighbour.


In the case of the half drop, the motif has shifted by half its length (vertical) or half its width (horizontal). However, you can ‘drop’ by any fraction you like; below is a third drop plan, again with a square foundation:

Unfortunately I couldn’t find any third drop examples in my stash, but I hope you get the idea!
Quick maths: Checking that your tessellation design will work
The key to success is to make sure that your original motif is divisible by the denominator of the proposed drop. That is, if you want to create a half drop repeat, the stitches or rows taken up by the motif must be divisible by 2 ( ½ ); if you want to create a third drop, the stitches or rows taken up by the motif must be divisible by 3 ( ⅓ ).
The half drop is a Very Big Deal in knitting and crochet because it creates beautiful art and solves technical problems. Here are a few you might have seen on your travels.
Examples of drop repeats in handknitting knitwear design
Drop repeats in stranded colourwork knitting designs
The diagonal lines created by half drop repeats are excellent for stranded colourwork because the fabric stress caused by colour changes is spread evenly. If you have knitted a lot of Fair Isle style designs, you’ll have noticed that diagonal lines create neater knitting, especially when long floats need to be woven in at the back.
Vertical lines can look bulkier and require more attention when blocking because the cumulative stress of colour changes is in the same location on every row. Visually, this can be distracting – a bit like having turning chains of crochet motifs in the same place on each round.
My Parquet cowl design uses half-drops to create the tessellation inspired by parquet flooring.


Parquet | Chunky Colourwork Cowl Knitting Pattern
Drop repeats in lace knitting designs
In a similar way, stress is relieved for cables and lace because of cumulative decreases and twists. It’s no accident that so many lace patterns are based on the half drop.
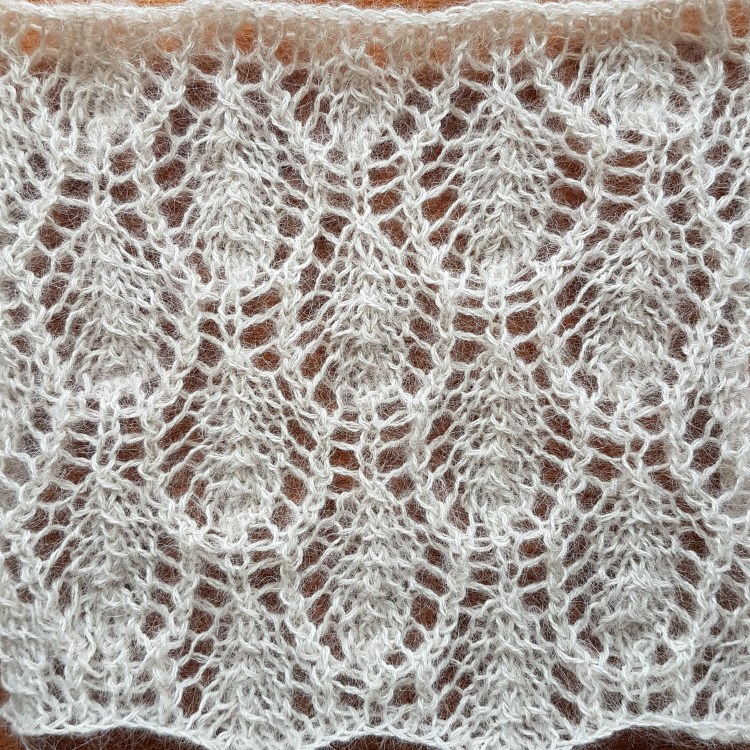
The falling leaves pattern, for example, cleverly offsets double decreases with eyelet increases. The ‘pulling in’ or axial bias at the centre of the leaf motif is offset by the expansion of the eyelet holes. At any point in the pattern, you will be knitting symmetrical opposites – as you decrease (sk2po) to form the pointed end of a leaf, you’ll be increasing (yarn over) to form the feathered fronds of another.
And just in case you needed more proof, drop repeats give themselves away by their diagonal lines, which form perfect diamonds. Here’s one of the leaf patterns again for you, along with my Falling Leaves sweater design:

Falling Leaves | Lace Leaf Sweater Knitting Pattern
Drop repeats in cable knitting designs
The cable motif – a sneak peek from my swatch box – exemplifies the importance of half drop repeats. Note how the sides of the swatch undulate according to the stress of the cable twists.
It is a work in progress, but you can see that in order for this to work as a repeated pattern – as opposed to a single panel, as it is currently – I need to ensure that the thinner area containing the knot, or the widest part of the fabric – is exactly halfway along the hexagon, the narrowest part of the fabric. The tessellation will form only when these two design elements are perfectly aligned.
This kind of problem solving involves rejigging the numbers, so the final motif may be slightly longer or shorter. Other relatively minor concerns like the knot can be easily worked out once the numbers are happy. There is no point in focusing on details like that until the overall structure has been confirmed, and I know exactly how many rows I have to work with when designing the knot.

Creating your own surface pattern designs
If you want to have a go at creating your own drop repeat knit or crochet designs, you cannot go wrong with squared paper. I will come back to tessellations again, so make sure you pop over to that post.
Pattern is absolutely everywhere, and knowing something about how it works just makes it even more fascinating. I have crammed a lot into this post, but there’ll be even more next month! In the meantime, I hope you begin to see pattern in the same way I do 😊.
And if you want to take things a little further, I have a taster course on design development and surface pattern design for knitwear! It features some of the designs in this post and how the drop repeats for knitwear designs like Unite and Assembly were developed.
Knitwear Design Initiation | Design Development taster course
An introduction to idea generation techniques for knitwear design, taken from the Design Development module of the Knitwear Design Initiation course. This focuses on garment silhouette and tessellations (designing repeating patterns).
The two techniques in this taster course will shed light on how you can create several ideas out of one, or none at all if your starting point is a stitch library. You’ll feel brighter, more inspired and confident about developing your existing design ideas.
They are adapted from exercises I learnt as a fashion student, and use two frameworks as starting points: the showstopper and the ensemble.
These idea generation techniques will help you to mine for gold in the depths of your imagination and avoid feeling like you’ve run out of ideas. Once you realise how much creative energy you have, you’ll feel brighter and more confident about being a successful knitwear designer.

Very interesting – thank you!
You’re welcome ☺️
Pingback:Knitwear Design 101: Tessellations and surface pattern design – Natalie Warner | Natalie in Stitches
Pingback:Knitwear Design 101: Introduction to Surface Pattern - Natalie in Stitches